Introduction
In Part 1, Hands-on CodeApps : Beyond the Hype and the Skepticism, we covered the big picture of CodeApps. I encourage you to take a look at it before starting this Part 2. That said, it isn’t a hard prerequisite for understanding what follows.
In detail, this second part focuses on:
- Prerequisites: the essential tools you need to install to develop a CodeApps app.
- Initialization: how to start a React/Vite project using the template provided by Microsoft.
- Project architecture: understanding the folder structure, the role of each file, and the value of this template.
- Transformation: how to convert a standard React/Vite project into a PowerApps CodeApps project/application.
- Customization: how to enrich the project by integrating your own components.
- Build and Deployment: the steps to compile and deploy the application to the Power Platform environment of your choice.
By the end of this tutorial, you’ll be able to understand the essential elements of a CodeApps project, identify the files and components to modify in order to adapt the template to your needs, and then deploy and share the app.
The tools you need
To develop CodeApps applications, you need a few tools. They help you edit your code, test your application, compile the files, and deploy to a Power Platform environment. These tools are:
- An IDE or code editor: Visual Studio Code or Notepad++. For this tutorial I willl use Visual Studio Code.
- Node.js: the tool that contains the JavaScript runtime, plus NPM, the package manager for Node.js projects. NPM is the equivalent of NuGet for the .NET Framework applications.
- Power Apps CLI: the well known Power Platform command line tool. It’s also used for PCF projects, plugins, and other automation tasks like deployment, export, import, and so on.
Make sure you’ve installed these tools before moving on to the next step.
Since we’re dealing with Power Platform applications, we favor languages like TypeScript. Note that this isn’t mandatory: you can still build a CodeApps app with vanilla (plain) JavaScript. So once Node.js is installed, open a command line and install TypeScript through NPM with this command:
>npm install -g typescriptThe -g flag installs TypeScript globally on your machine. That means every user on your machine will have it available, which is ideal if you plan to work on other projects that use TypeScript.
We now have the prerequisites to start developing a CodeApps app, so let’s head straight to the next step…
Initialize and Build
In this section we’ll look in detail at how to initialize a CodeApps project, what it’s made of, which technologies/libraries it uses, and how to customize it to fit our needs.
Initialize a CodeApps project
A CodeApps project is, first and foremost, a modern JavaScript (ECMAScript)/React project, and a project built with these two tools can be configured in many ways, from the simplest to the most complex. To help with that, Microsoft provides preconfigured templates, which you can find in Microsoft’s GitHub repository. To initialize a project, type this on the command line, from CMD or the Visual Studio Code terminal:
>npx degit github:microsoft/PowerAppsCodeApps/templates/vite MyAppTutothen type:
>cd MyAppTutoOpen this folder with Visual Studio Code.
Now, I know you’re wondering what on earth that was. That’s perfectly normal, and I’m well aware there’s a lot packed into a single line, so let me break it all down for you.
- npx: NPX is an NPM/Node.js sub-program that works almost the same way as NPM, except npx doesn’t install anything locally on your machine. It’s mainly used to run sub-programs that you only need occasionally. And that’s exactly the case for degit and our CodeApps project template. We only need the template to initialize a project, full stop.
- degit: a Node.js sub-program used to clone GitHub repositories while keeping the commit change history.
- The first parameter of degit is the path to the GitHub repository.
- The second parameter is the name of the folder where the cloned repo will be placed; in our case the folder will be named MyAppTuto.
So what’s happening here is that we need to grab a Vite template that lives in a GitHub repository in order to initialize our CodeApps project. We actually have two options: either use git clone, or use npx degit.
With git clone you risk downloading the entire repository and all its branches to your local machine, and then you’d have to manually delete whatever you don’t need. Not very convenient, right?
Or, even better, you can use degit. But we don’t want to install degit on our machine, because we’re not sure we’ll use it later for another project. So, to run this program without installing it locally, we use npx (Node Package Executer), which lets you run a program without needing a local installation. That’s what’s going on above.
Understanding the structure of a CodeApps template
Once we’ve cloned the template, we can now explore what it contains.
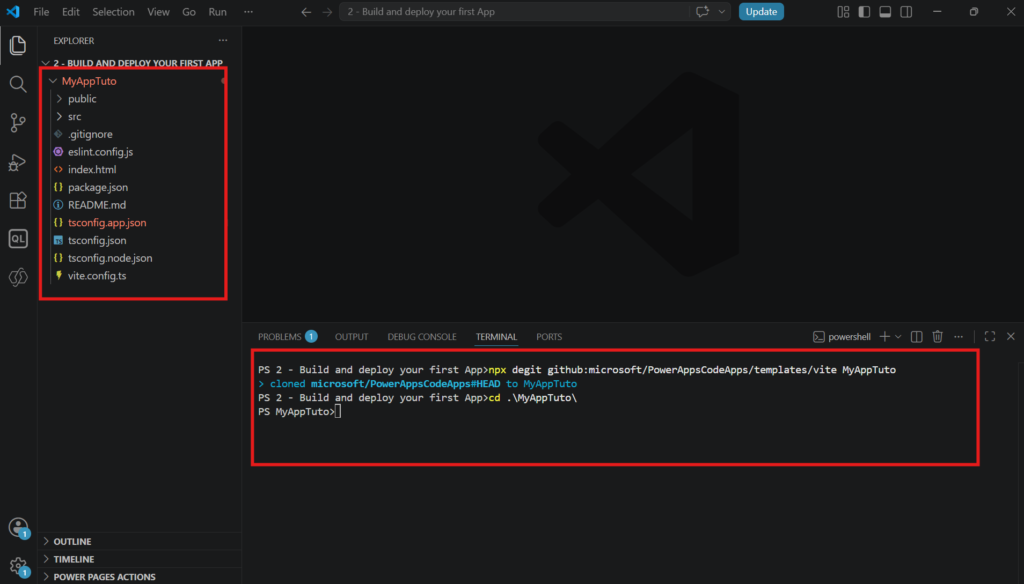
As we can see, a CodeApps template, even before it’s transformed into a CodeApps project, is just a basic JavaScript/Vite or React project. And before running the command that turns it into a Power Apps CodeApps project, I’m going to break down the purpose of each folder and file present. Once that’s clear, it will be easier to understand the added value of the CodeApps transformation, and you’ll be able to read and understand any CodeApps project template (from the simplest to the most complex).
Root folder
The root folder of our project is MyAppTuto, and in this project folder, at the root, there will always be a public folder, an src folder, an index.html file, and several config files ending in .ts/.js, .json.
The public folder
This folder stores publicly accessible files, which are served to the public without requiring authentication: files such as the app/site logo images, images for the authentication page, and so on. In short, any non-sensitive file that can be served publicly without authentication.
The src folder
This folder is the main folder of your custom app. This is where you create the source files/scripts for your app’s components: .tsx files (individual components), .ts files (types/interfaces/services or utility classes), .css files for styling your components/pages, and all sorts of resources used by your components or the app as a whole (including images, icons, and so on). This folder can also contain a subfolder named asset/, to hold images or icons, but it isn’t mandatory, because you can place images and icons wherever you like. You just need to reference the exact paths correctly in the components or pages where you use them.
In this folder, we also find 5 files. So what are they used for ? Well, thanks for asking:
- App.tsx: in a modular JavaScript project (React, Vue, etc.), “App” is the name conventionally given to our main object/component/page/screen. It’s the one that wraps all the smaller components that make up our application. You don’t have to name it that way; it’s a convention, a best practice. Why .tsx ? Because the language used is ts (TypeScript), and the x is a convention used in React projects to tell the compiler that the file contains React syntax/objects. If we were using plain JavaScript, the file extension would be .jsx instead of .tsx.
- App.css: a classic on a web project. It’s the file that holds the CSS styling for the App.tsx component/file.
- index.css: the file that holds the styling for the index.html page located at the root of the project.
- main.tsx: the entry point of our custom app. It’s the equivalent of the index.html of classic PHP web apps. But in this kind of project we name it main.tsx, and it contains the instantiation of our main App component declared in the App.tsx file; this file is referenced in the global entry file index.html.
From the inside, main.tsx is the entry point; from the outside, index.html is the entry point.
Others Files in the root folder
At the root, we also find other secondary but important files, particularly for the project’s general configuration.
- .gitignore: a classic file on any version controlled project. It’s used to ignore compiled files that don’t need to be versioned.
- eslint.config.js: a file used to provide the project configuration for flagging JavaScript/TypeScript syntax issues. It lets the IDE or compiler anticipate common syntax problems and suggest fixes.
- index.html: the entry point of the overall project, the first page served in the browser. This file references the entry point of our custom application that contains our custom code/component, namely main.tsx.
- package.json: the file that tracks all the packages/dependencies and libraries used in the project.
- tsconfig.app.json and tsconfig.node.json: files used to configure the compiler options for TypeScript. They can be split across different files, as long as they’re referenced by a main file.
- tsconfig.json: the main TypeScript configuration file. It is the orchestrator of the other TypeScript configuration files, which is why it references the two others: tsconfig.app.json and tsconfig.node.json.
- vite.config.ts: the configuration file for the build tool and the test web server. It makes sure the necessary dependencies are integrated to compile, run, and serve our app in a browser in Dev mode.
Remember that most of these elements aren’t new concepts: 90% of the files at the root already existed in PCF (Power Apps Component Framework) projects. The principle stays the same.
Transforming a Vite template into CodeApps
Now that we know what each file in the base template is for, we can shift up a gear: transforming this template into a real CodeApps project.
To perform this conversion, we’ll use the PAC CLI (Power Platform CLI) with the appropriate commands.
Connect to a Power Platform environment, and select it
The first step is to connect to Power Platform:
>pac auth createAfter connecting to Power Platform, you need to choose your target deployment environment, usually a development environment. Since you can have several connections on the cache, to keep pac cli from picking an arbitrary target environment you have to tell it to use a specific environment:
>pac env select --environment <environment id>Replace <environment id> with the unique ID of your development environment.
Why do we need to select a specific environment before transforming the project into CodeApps ? Well, Simply because the initialization and transformation command needs this information to configure the deployment environment, as well as the target environment from which the application’s public URL will be generated.
Install the PowerApps dependencies
Since we downloaded a template from GitHub, the libraries the project depends on (the dependencies) aren’t pre-installed. So we first need to install them by typing:
>npm installThis command will install all the libraries and dependencies declared in the package.json file, in the dependencies and devDependencies sections.
Transform the template into CodeApps
We are now ready to transform our template into a Power Apps CodeApps project. Type the command:
>pac code init --displayname "My Tuto App"Technically, this command initializes the configuration file of a CodeApps app. If you look at the root of your project, you should now have a new power.config.json file with your app’s information.
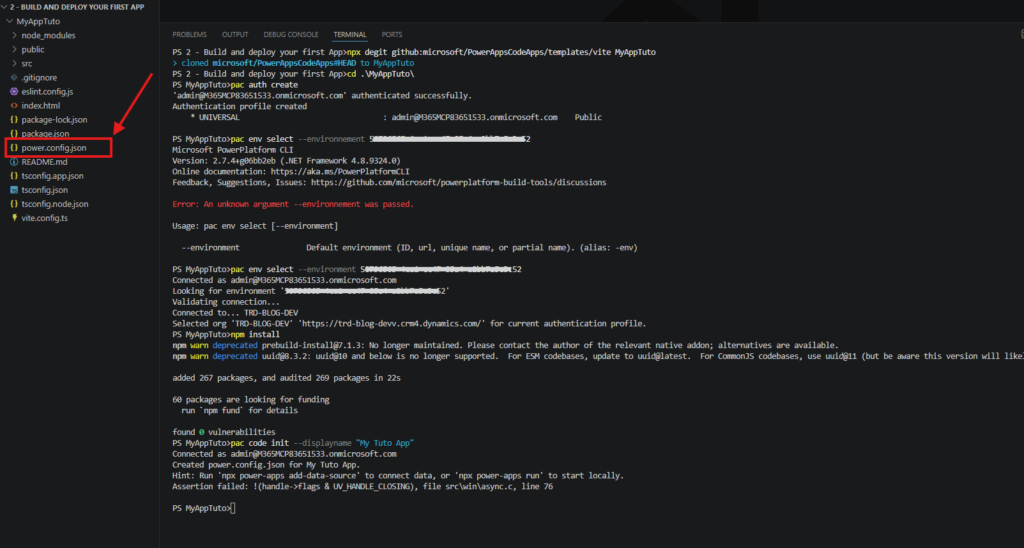
What does each line in the power.config.json file mean ?
{
  "version": "1.0",
  "appId": null,
  "appDisplayName": "My Tuto App",
  "region": "prod",
  "environmentId": "50796565-****-****-****-a2bb7a5c3c52",
  "description": " ",
  "buildPath": "./dist",
  "buildEntryPoint": "index.html",
  "localAppUrl": "http://localhost:3000",
  "logoPath": "Default",
  "connectionReferences": {},
  "databaseReferences": {}
}
Here’s why each entry in the power.config.json file matters:
- version: the version of your application. It’s crucial if you deploy your solutions in managed mode. If you don’t increment this number, future changes won’t be applied when deploying to another environment. Make sure to increment it each new release.
- appId: the identifier of the application in the target environment. During initialization, this field isn’t critical since the application hasn’t been deployed yet. It’s optional at first, and you’ll be able to fill it in manually once the first deployment to your development environment is done.
- appDisplayName: the display name of the application. If you plan to rename your application after its first deployment, filling in the appId field becomes essential. This prevents the system from creating a new CodeApps on Power Platform because of the name change.
- environmentId: the identifier of the selected development environment.
- buildPath: the path of the folder where the deliverable (bundle/package) will be placed after the build. This package is what will then be pushed to your Power Platform environment.
- buildEntryPoint: the main HTML file of your project (usually index.html). It’s the one that references your main.tsx file, the main entry point of your application.
- localAppUrl: the local (localhost) URL of your application, used for local testing and debugging phases.
- connectionReferences: this entry stores the connection references for the various connectors (Dataverse, Power Automate, etc.). It’s updated automatically by the PAC CLI each time you add a new connector.
- databaseReferences: this entry stores the references of the data sources used (Dataverse, etc.). Just like connections, it’s managed and updated automatically by the PAC CLI when new resources are added.
Run/test your CodeApps locally
To run and view your CodeApps locally, type the classic npm command:
>npm run devThis command starts the local web server and gives you a URL to access your app from localhost so you can test it in real time.
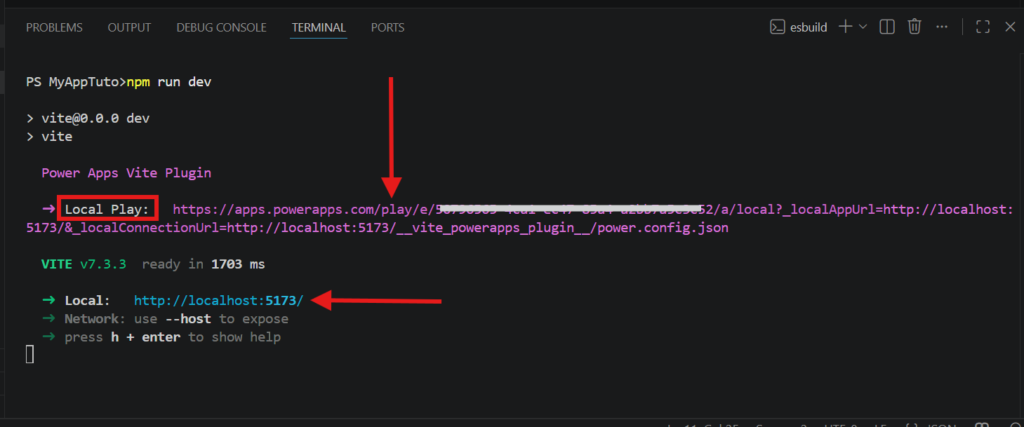
Take the Local Play or Local URL and put it in your favorite browser, and you should get a result that looks like this:
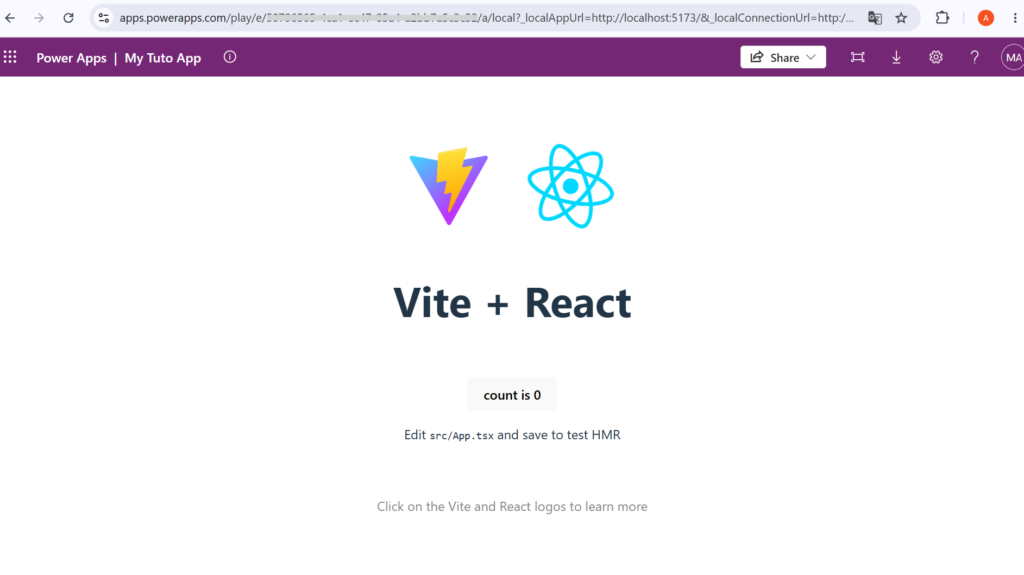
There you go, congratulations! You’ve just configured, launched, and tested your first CodeApps.
If you’re as curious as I am, one question must be running through your mind: how is all this possible? How does the browser manage to display and run our app straight from localhost?
In reality, this is the very principle of a Vite template, like the one Microsoft provides that we cloned from the Git repository. This template natively integrates Vite, a build tool bundled with a lightweight web server. It’s able to serve web pages instantly, without needing to install a heavy server (like IIS or Apache).
All of this is possible thanks to Node.js, which we installed at the very beginning. Node.js provides the JavaScript runtime as well as the NPM tool. NPM lets you run other packages and tools/sub-programs, notably Vite.
One important nuance to note: we only need Node.js, NPM, and Vite for the local development and testing phase. Once the application is built, these tools are no longer needed at all. For deployment, we simply get a bundle (a deliverable) containing plain, classic HTML, JavaScript, and CSS, which will be deployed directly into our Power Platform environment.
How do we produce this bundle that gets deployed? We’ll see that shortly. But first, let me show you how to modify or customize your application by adding new components. Then we’ll look at how to compile and deploy to the environment of your choice.
Customize your project by adding new components
The Vite template simply lays the foundations of the build architecture. For the application to truly meet your needs, you’ll have to customize it by adding new pages and new components through code.
To illustrate this, we’ll work on a simple use case that’s very common in the Dynamics 365 / Power Platform ecosystem: building a newsletter style sign-up page.
This application will contain a very simple form with an email address field and a submit button. We’ll also add a bit of CSS to style the whole page.
In the App.tsx file, replace the code of App.tsx with the code below:
import './App.css'

function App() {

  return (
    <>
      <div className="">
        <div className="card">
            <h2>Subscribe to TRD Business CRM Newsletter</h2>
            <p>Be Updated with latest articles on D365 & Power Platform </p>
            <form id="thanks" >
                <input type="email" name="email"
                    id="email"
                    placeholder="Enter your email"
                    required />
                <button type="submit">
                    Subscribe
                </button>
            </form>

            <p className="msg" id="congo">
                Thanks for subscribing TRD Blog!
            </p>
        </div>
    </div>
    </>
  )
}

export default App
It’s mainly the code inside the return (<> </>) tags that has been changed.
In the App.css file, replace the content with this new code:
#root {
  max-width: 1280px;
  margin: 0 auto;
  padding: 2rem;
  text-align: center;
}

body {
    font-family: Arial, sans-serif;
    background-color: #f2f2f2;
    margin: 0;
    padding: 0;
}

.card {
    background-color: #ffffff;
    border-radius: 10px;
    box-shadow: 0 3px 7px rgba(0, 0, 0, 0.4);
    padding: 50px;
    text-align: center;
    max-width: 400px;
}

.container {
    display: flex;
    justify-content: center;
    align-items: center;
    height: 100vh;
}

h2 {
    color: #36b75a;
    margin-bottom: 10px;
}


form {
    display: flex;
    flex-direction: column;
    align-items: center;
}

p {
    color: #666;
}

.msg {
    display: none;
    color: green;
    margin-top: 40px;
}


input[type="email"] {
    width: 65%;
    padding: 12px;
    margin-bottom: 15px;
    border: 1px solid #ccc;
    border-radius: 7px;
}

button {
    background-color: crimson;
    color: #fff;
    padding: 10px 10px;
    margin-top: 5px;
    border: none;
    border-radius: 5px;
    cursor: pointer;
    transition: background-color 0.4s ease;
}

button:hover {
    background-color: #65686b;
}
After making these changes, type the command below to start the server and view the changes you’ve made:
>npm run devYou should get a result that looks like the screenshot below:
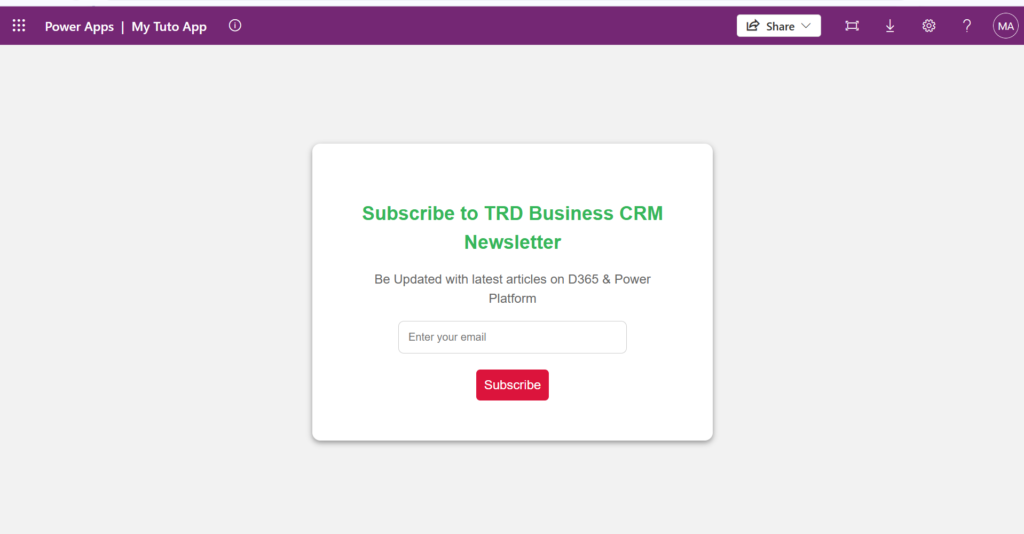
We’ve customized the app, so we’re now ready to deploy it to the environment of our choice and finally be able to share it with other users.
Compile/build and Deploy
We have our application coded and tested; we’re now going to deploy it to our environment.
To deploy, we need to build the project to produce a bundle, or, as we’d call it on other technologies, an “executable” or “binary”. But on a JS/React application and the like, we call it a bundle (the combination/compilation of all the files).
To build your app, just type:
>npm run buildAfter building, you’ll see a new folder in the project named /dist.
Our bundle is ready; it’s time to deploy to our environment.
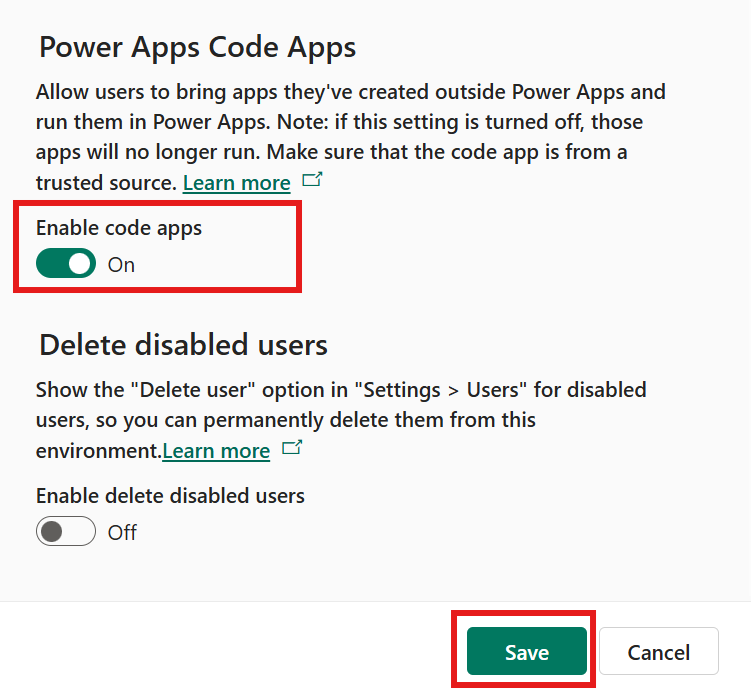
Before deploying, make sure the CodeApps feature is enabled on your environment by going to: Environment → Settings → Features → Power Apps Code Apps.
To deploy to your environment, just type the command below:
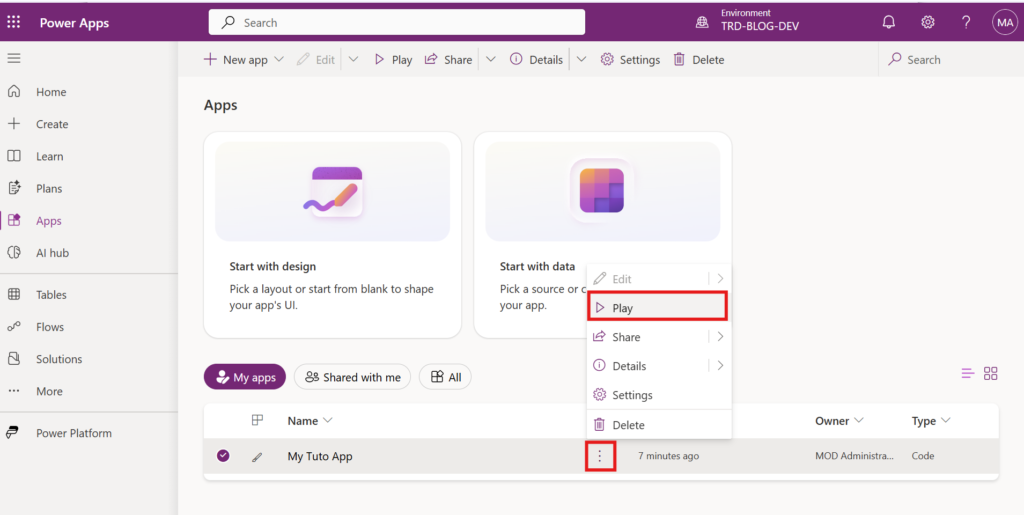
>pac code pushTo see your app, go to make.powerapps.com and select your environment. Click Apps in the left-hand menu and you’ll find your new app, “My App Tuto”.
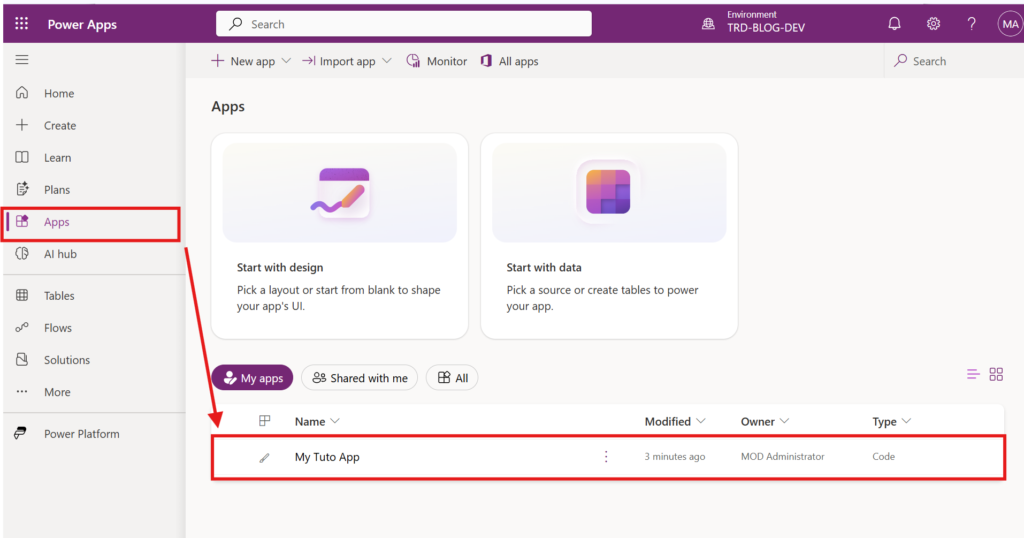
To preview it, just click the three dots and click Play.
Then you have the application served with its public URL:
Summary
If you’ve made it this far, congratulations, you’re a champion! You’re now fully ready to tackle more advanced topics on CodeApps.
Pingback: Power Apps CodeApps npm CLI: Quickstart Reality Check - The Rational Developer