P2 : Implementing Power Platform Pipelines in your project
Introduction
In the previous article, I introduced the concept of ALM with Power Platform Pipelines here , providing an overview of the ‘what,’ ‘when,’ and the prerequisites for adoption. If you haven’t had a chance to check it out yet, I highly recommend reading that first to set the foundation before we dive deeper into this next chapter.
Since we have covered the theory, prerequisites, and intrinsics of ALM with Power Platform Pipelines, in this article, we are going to get our hands dirty by implementing small, real-world scenarios. We will then transition to larger case studies in Part 3: Extending Power Platform Pipelines in your project.
By the end of this article, you will be able to configure Power Platform Pipelines, execute deployments (export/import), and monitor them effectively. Let’s jump right into it…
First thing first
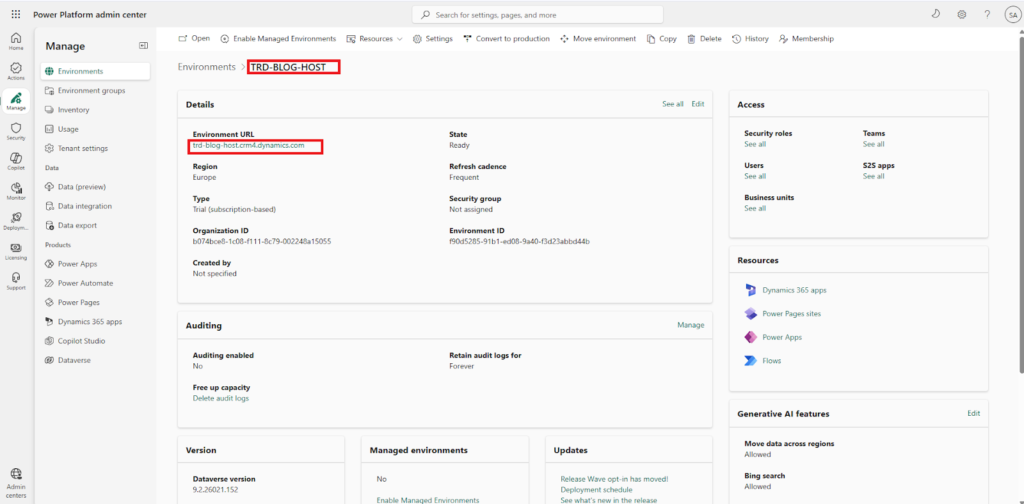
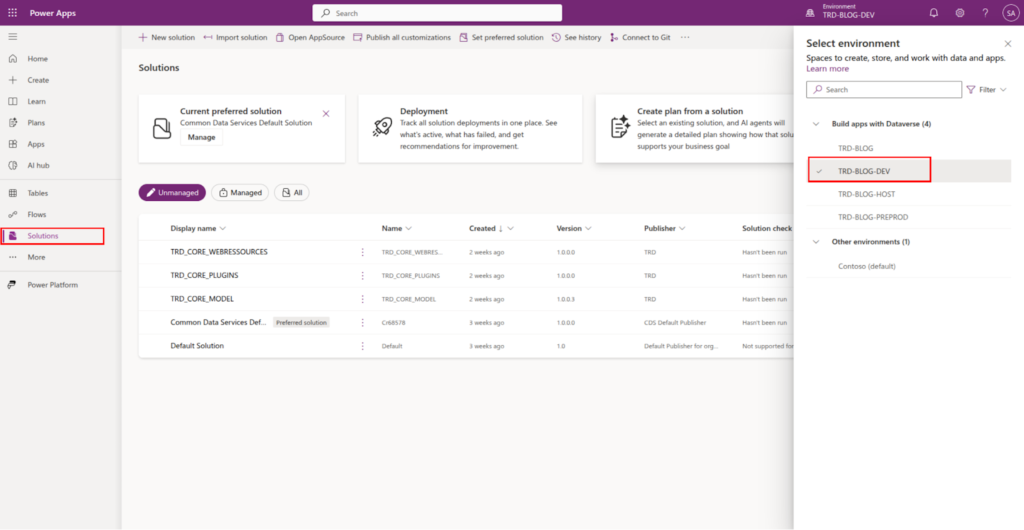
To start implementing ALM with Power Platform Pipelines in your projects, you need to go to your host environment – the one we created in Part 1. Follow the steps below:
from the Power Platform Admin Center→Environments select the Host environment and open URL of the Host environment
you should be able to see the model driven app Deployment Pipeline Configuration dedicated for ALM with Power Platform Pipelines
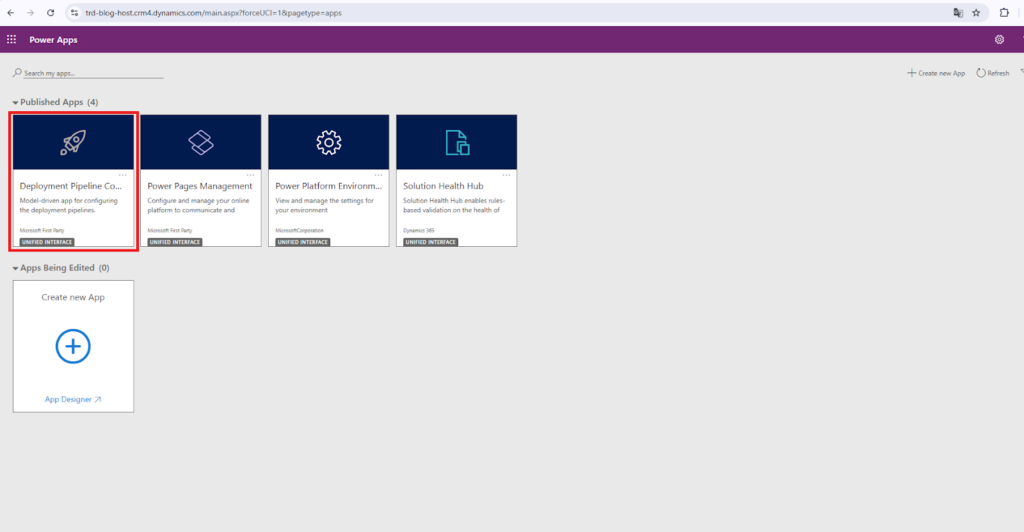
Click to enter and see what it looks like
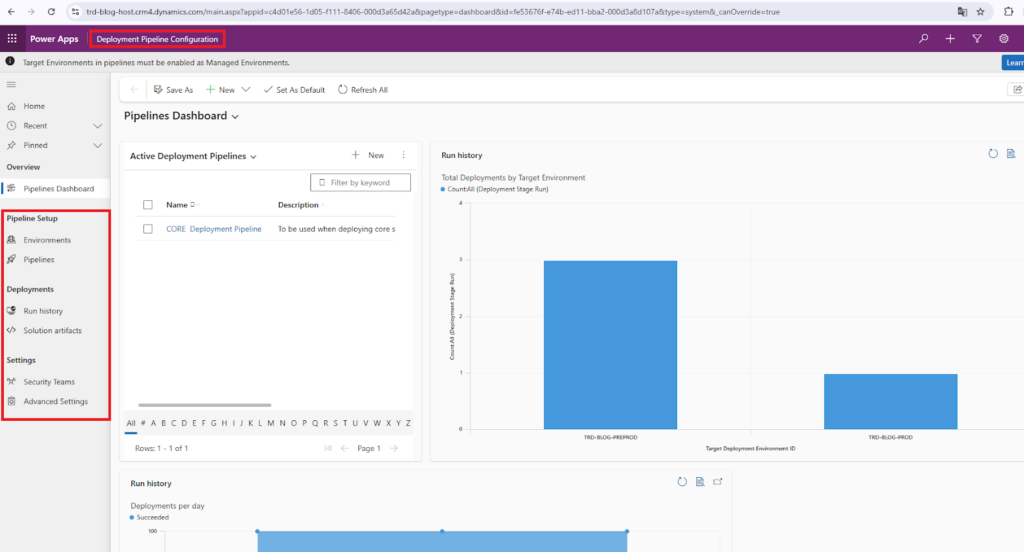
In order to create Power Platform Pipelines that will export and import your solutions, we need to configure two major components: Environments and Pipelines… Wait, what? Just follow my lead 😉
What are Environments in Power Platform Pipelines ?
Environments are configurations that allow you to declare which specific environments are permitted to be attached to your Power Platform Pipelines. These are the environments that will potentially serve as either a source (development) or a target (test/production) environment.
What are Pipelines in Power Platform Pipelines ?
Pipelines are configurations that allow you to create the automated path that will use your declared environments to export solutions from and import solutions to. It’s the classic .zip solution deployment, but fully automated!
Putting it all into practice
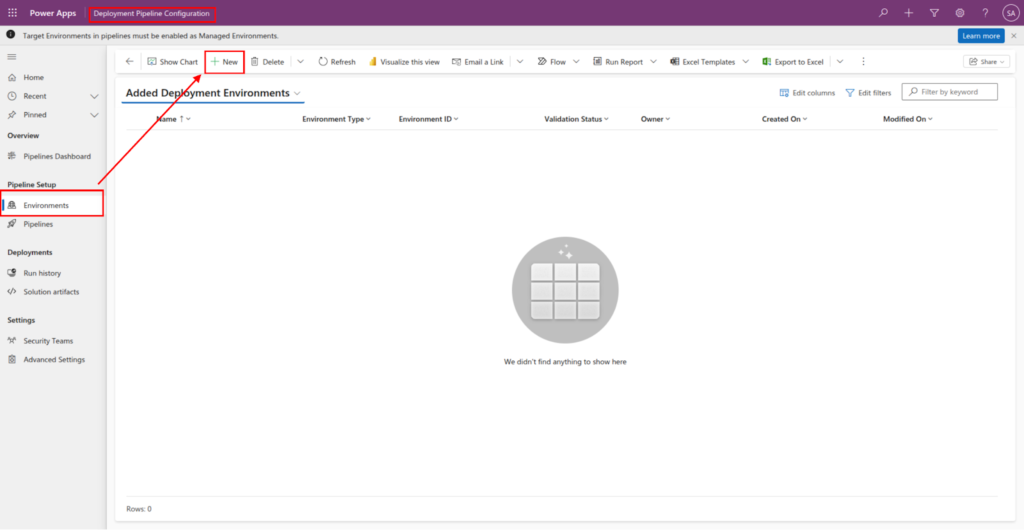
How to Create Environments
To create environment, go to Pipeline Setup Subarea → Environments and click New
Fill in the mandatory fields as shown in the image below:
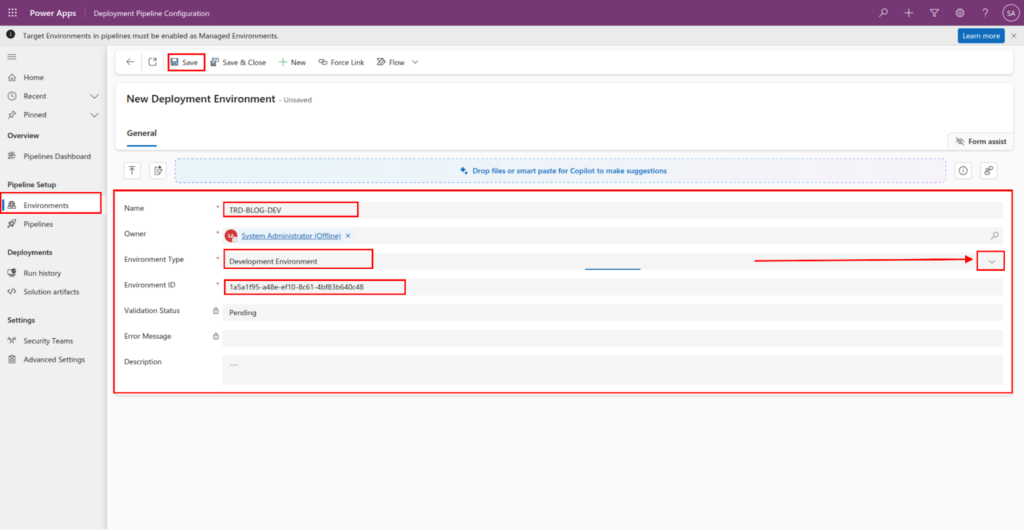
Description of fields
- Name : The Display name of the environment. It does not need to match the real name of the environment on Power Platform Admin Center
- Environment Type : Used to specify the type of environment. Select Development environment for source environments, and select Target environment for target environments where the solutions need to be deployed/imported to like( UAT, PREPROD, PROD ).
- Environment ID : The unique id of the environment in question. You can extract from the Power Platform Admin center, on the environment page.
After filling in all the mandatory fields, click the Save button
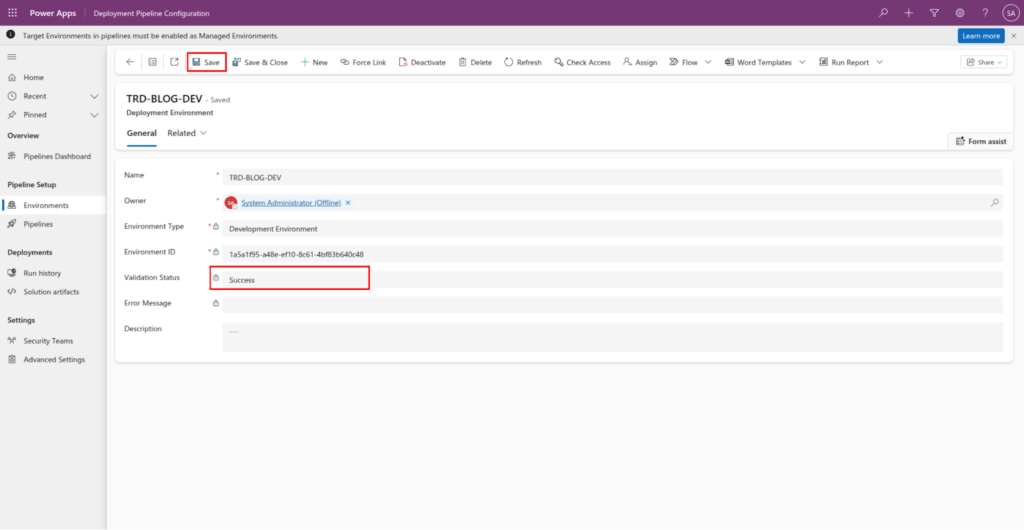
If the system validates the Environment ID and finds a matching environment, the record will save with a Success status. However, if the ID is incorrect or the environment cannot be reached, an error message will appear indicating that it was not possible to create the record.
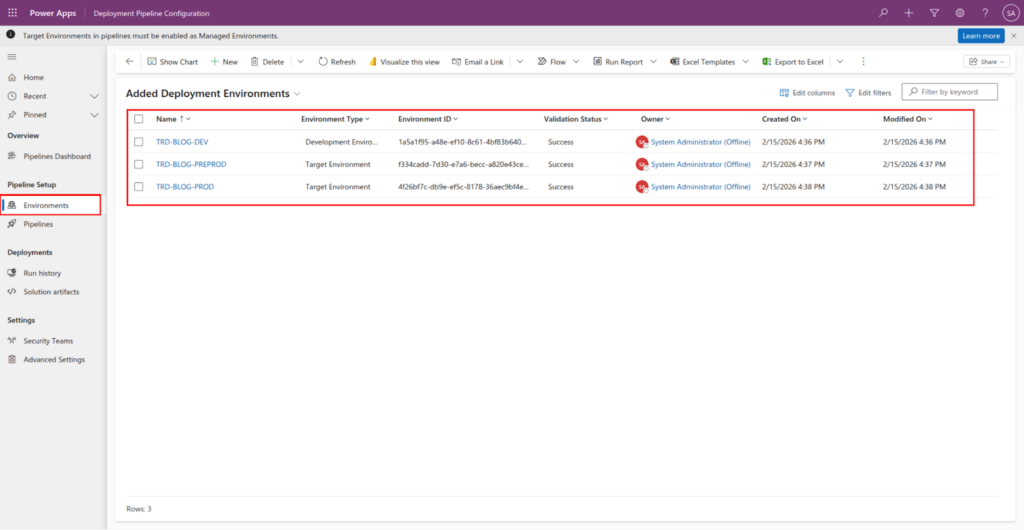
You will need to repeat these steps to declare your Target Environments, such as PREPROD and PROD (if applicable). Ensure that you correctly set the Environment Type to ‘Target’ for each of these records.
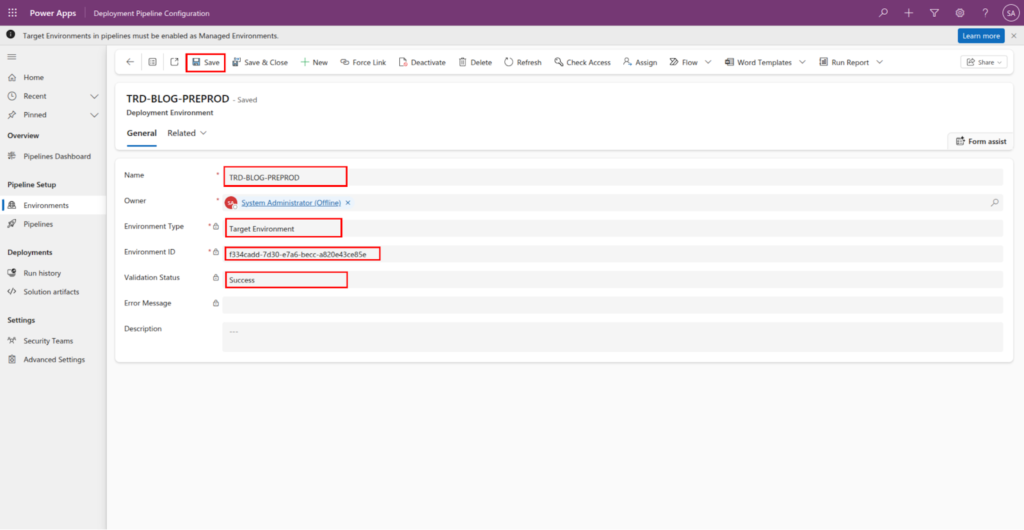
Since PREPROD is a target environment, we need to select the Target Environment option for the field Environment Type.
While it is not mandatory, I have created a third environment – PROD. After creating the environment in the Power Platform Admin Center, you can declare it as a target environment within the Pipeline Setup subarea. Once finished, your list should look similar to the one below:
Now that we have declared the environments that will participate in our deployment process, we can create the actual deployment Pipeline that will handle extracting and deploying our solutions.
How to create Pipelines ?
Now that we have our logical environments declared, we can create the Pipelines that will use those environments to extract and deploy our solutions.
To create a pipeline, Go to Deployment Pipeline Configuration app, navigate to Pipeline Setup → Pipelines.
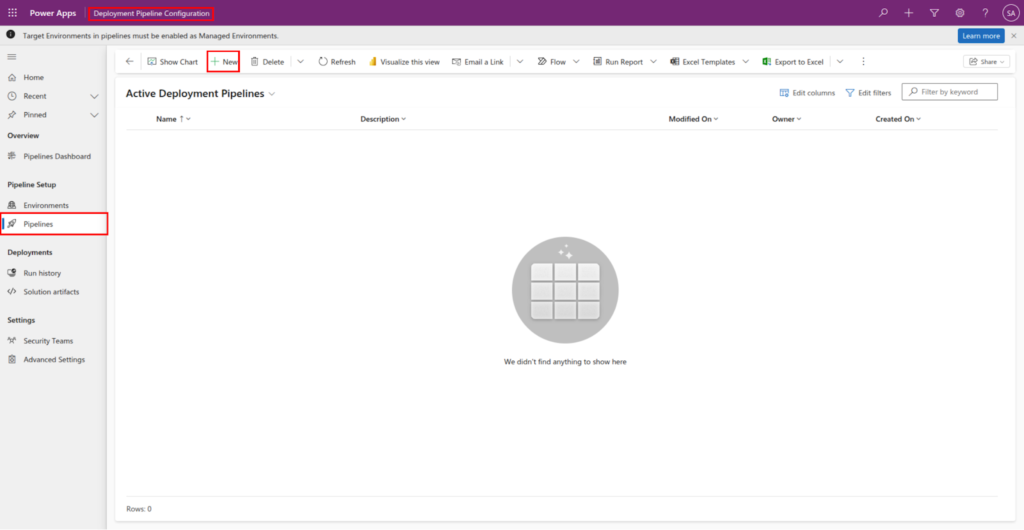
Click the New button to create a new pipeline, and fill in the highlighted fields as shown in the image.
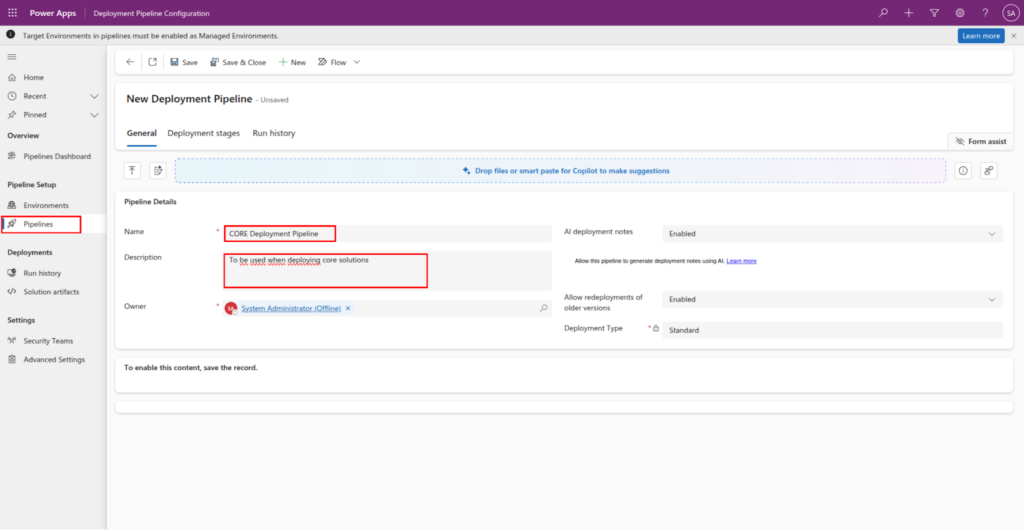
Click Save button
- General tab :
- Pipeline Details section : here, you can view regular information about the pipeline, including its configuration details and current status.
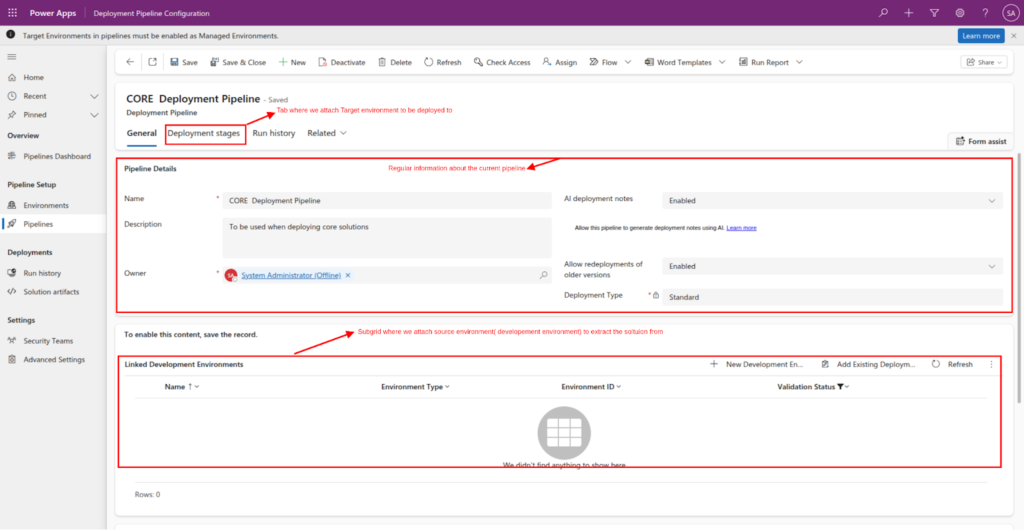
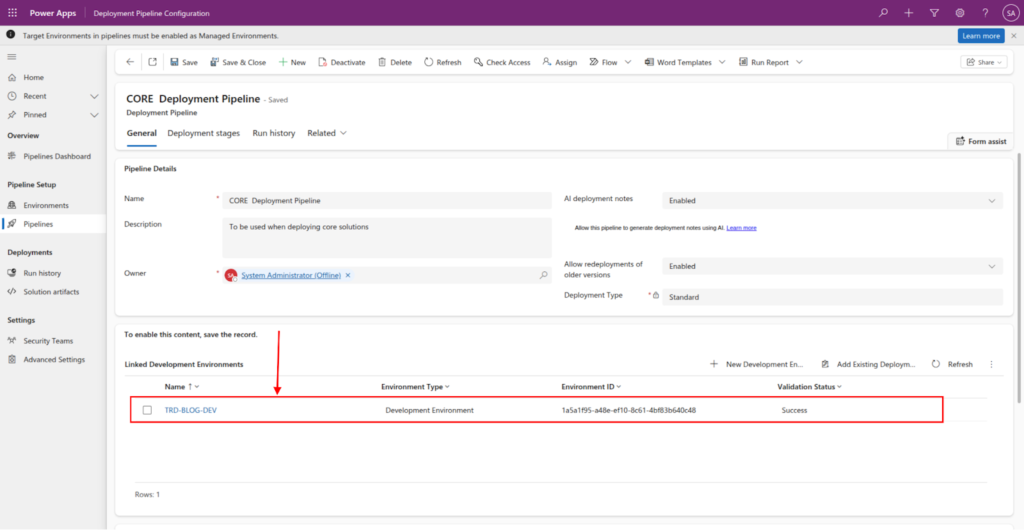
- Linked Development Environments section: Here is where you attach the source environment to extract solutions from.
- Deployment stage tab: Here is where you attach target environments to deploy solutions to, like PREPROD and PROD.
Since we have already declared our environments in the previous section, you can simply click the Add Existing button on the subgrid to attach them to the pipeline.
On the Linked Development Environments subgrid/section, Click Add Existing Deployment Environment to add our TRD-BLOG-DEV as source environment.
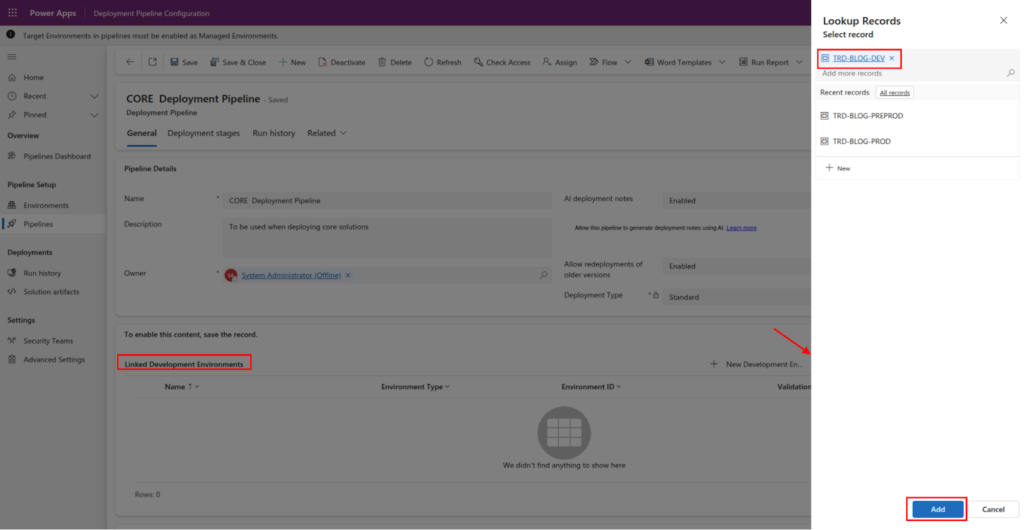
Source environment Added to the pipeline
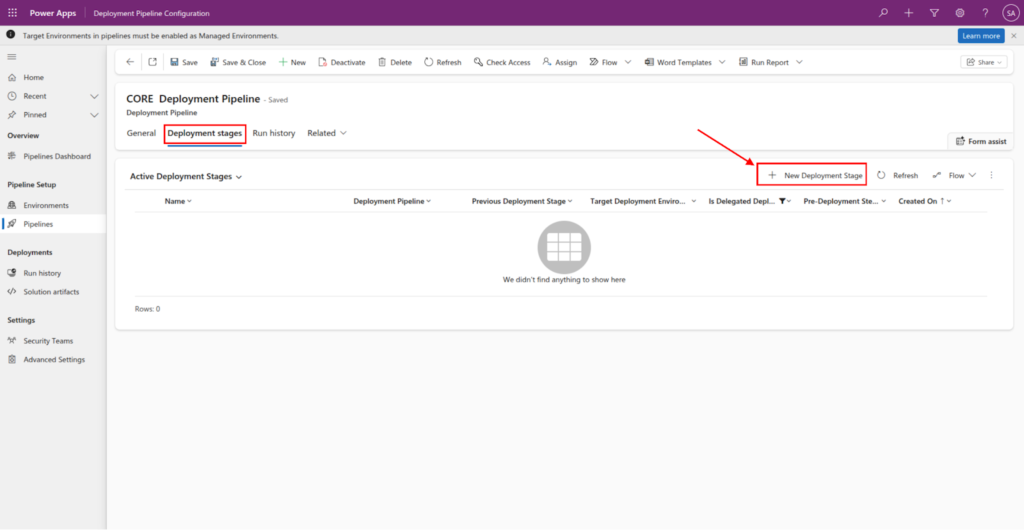
We can now add target environments to the pipeline. Select the Deployment stages tab and click New Deployment stage button create Deployment stage.
Fill in the highlighted fields, and click the Save button
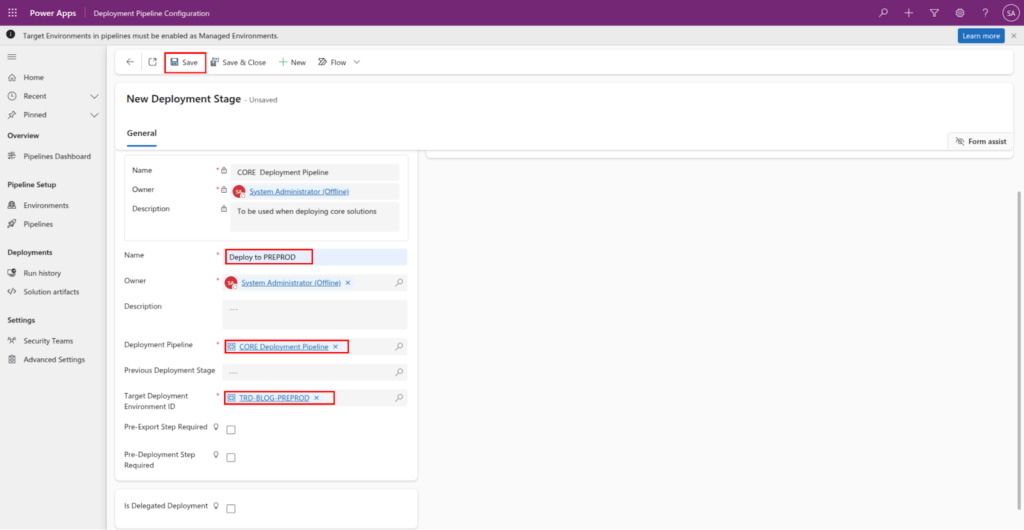
- Name : The name of the deployment stage. Usually similar to the environment that you are deploying to.
- Deployment Pipeline : The pipeline that this stage should be attached to
- Target Deployment Environment ID : The actual environment that this stage should deploy the solution to.
- Previous Deployment Stage : This field allows you to specify if there is a stage that should be executed before executing the current stage. Like, “deploy to PREPROD before PROD”.
- Pre-Export Step Required : This field allows extension of the stage/pipeline. If checked it triggers an action that can be caught and used to extend ( approval, run custom flow, action to do other background processes) the stage before doing the actual export of the solution from the development environment.
- Pre-Deployment Step Required : Also, this field allows extension of the stage/pipeline. If checked it triggers an action that can be used to extend ( approval, run custom flow, action to do other background processes) the stage before doing the actual deployment of the solution to target environments.
Regarding the Previous Deployment Stage and Pre-Export Step Required fields, we will deep dive into those in Part 3: Extending Power Platform Pipelines, where we will explore advanced topics like scheduling, approvals, and automated deployments.
Now that our pipeline configuration is complete, we are ready to execute our first deployment!
How to run a Power Platform Pipeline ?
To execute a standard Power Platform Pipelines deployment without any custom extensions, a manual trigger is required. To initiate this, you must start within the Source Environment and then trigger the specific pipeline containing the stages you wish to run.
Go to make.powerapps.com select the development/source environment → TRD-BLOG-DEV
Important Limitation
One current constraint of Power Platform Pipelines is that you can only deploy one solution per pipeline run. However, the pipeline itself is highly reusable; the same Power Platform Pipelines configuration can be used to deploy any number of different solutions - just one at a time.
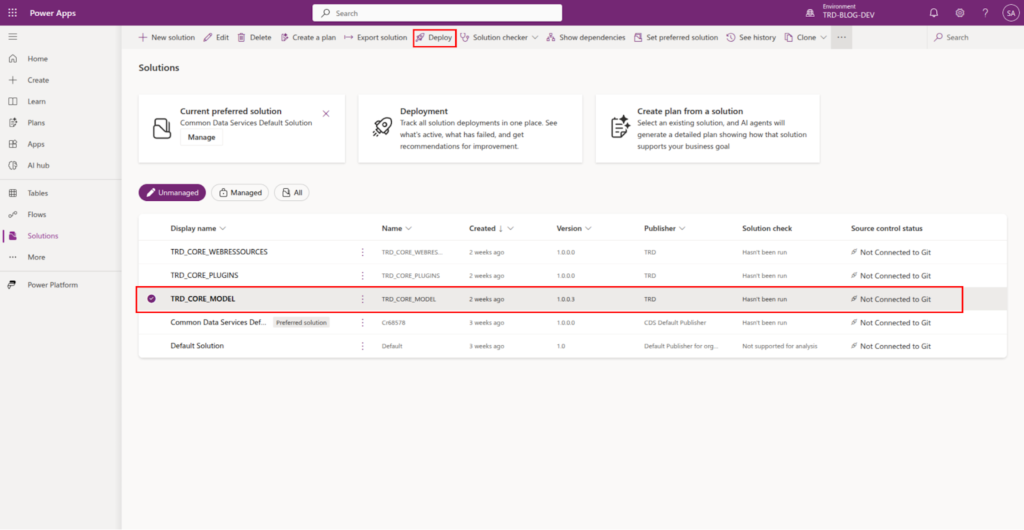
To begin the deployment, you must first select the specific solution you intend to move.
Select the solution you want to deploy, and the click on the Deploy button
Within the interface, you can see every stage that was created during the Power Platform Pipelines configuration.
Important Limitation
Manual Intervention: In a standard Power Platform Pipelines setup (without extensions), human intervention is required to click "Deploy" for each subsequent environment in the chain. For example, once the solution reaches Preprod, a user must manually trigger the move to Production.
We will explore how to bypass this and enable auto-deployment by extending the Power Platform Pipelines functionality in Part 3.
Click Deploy Here to initiate export and import to target environments.
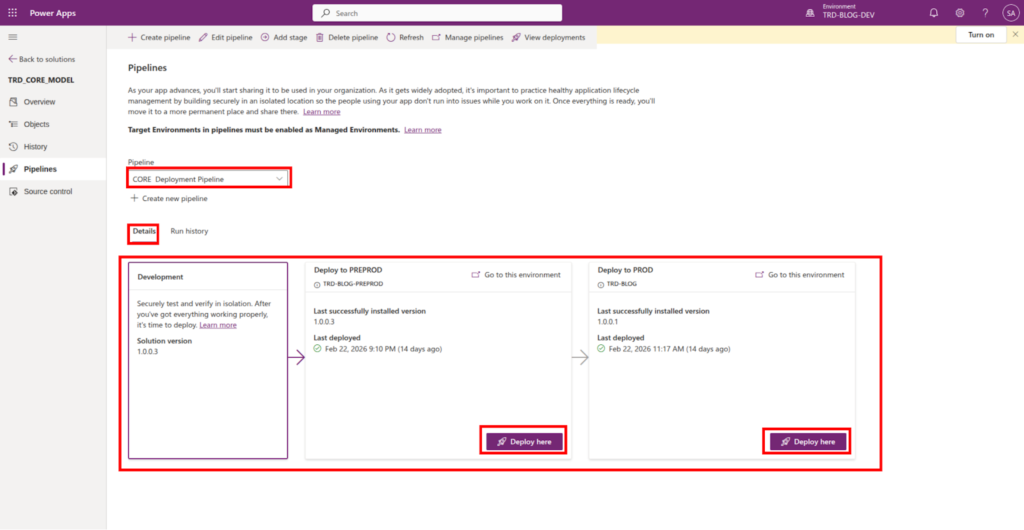
After deployment we can see the history or summary on the Run details, on the tab Run history.
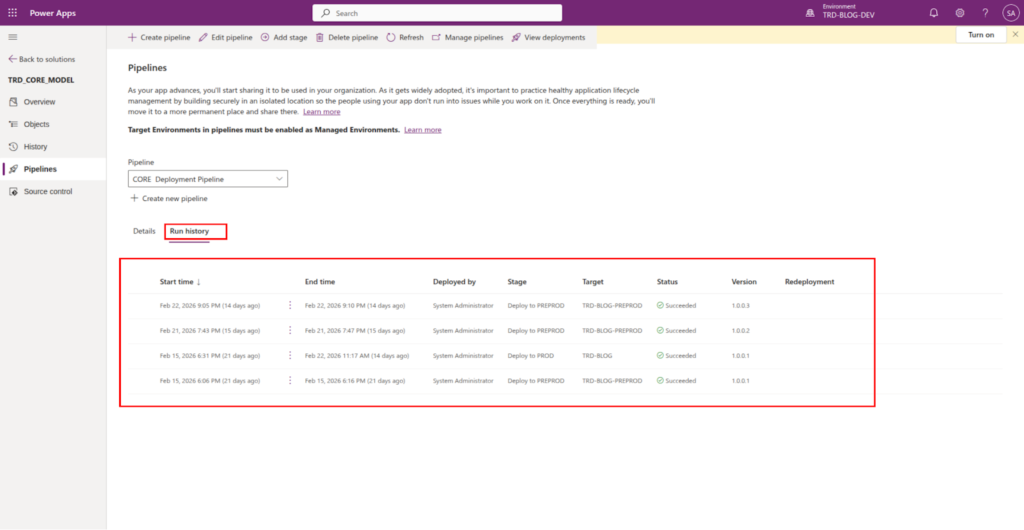
Or Run history on Deployment Pipeline Configuration app
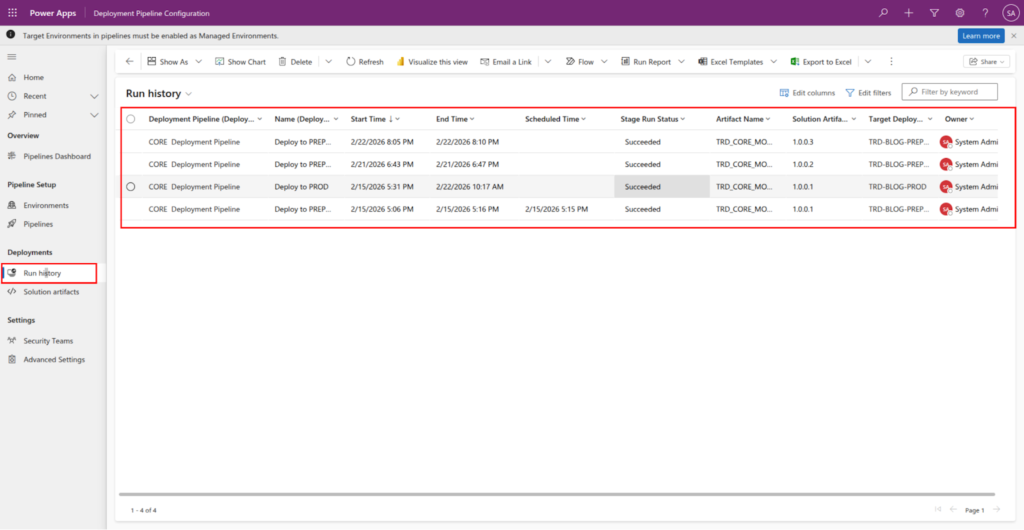
It is important to note that while a manual click is required to trigger the deployment for each subsequent target environment, the solution itself is exported only once.
Once the initial export occurs, the solution is saved as a permanent record in the Artifacts table. This same version – the exact same digital package – is then deployed to every target environment within that Power Platform Pipelines run.
Why this matters ?
- Enhanced Security: It ensures the integrity of the delivered packages by preventing any mid-stream changes to the solution.
- Simplified Debugging: Since the identical version is deployed across all environments (e.g., Test, PREPROD, and PROD), you can be certain that any behavior observed in testing will be consistent in production.
- Auditability: You have a clear trail of the specific artifact version that moved through your Power Platform Pipelines.
The solution Artifacts can be seen on the Deployment Pipeline Configuration app, On Deployments subarea.
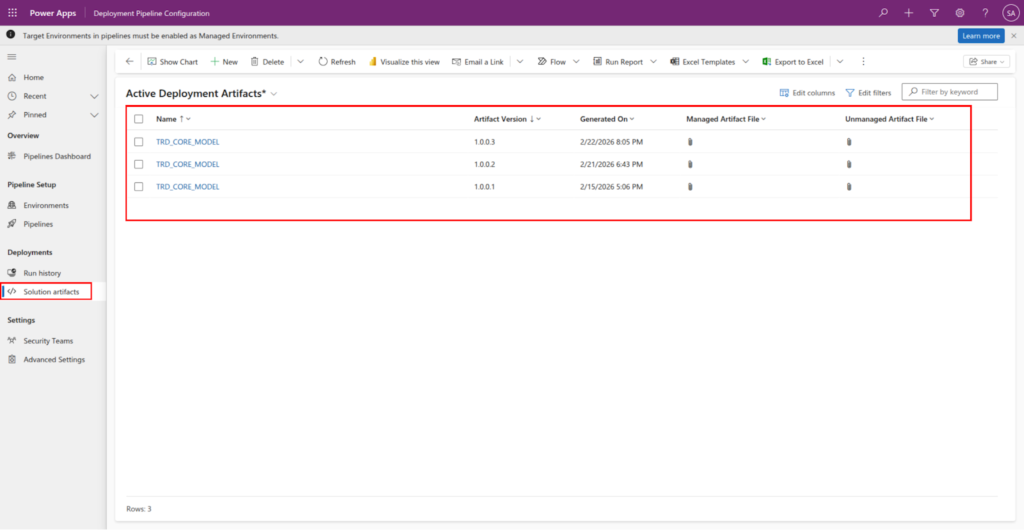
Open an artifact record and see what it is composed of. It is a just regular .zip unmanaged and managed solution.
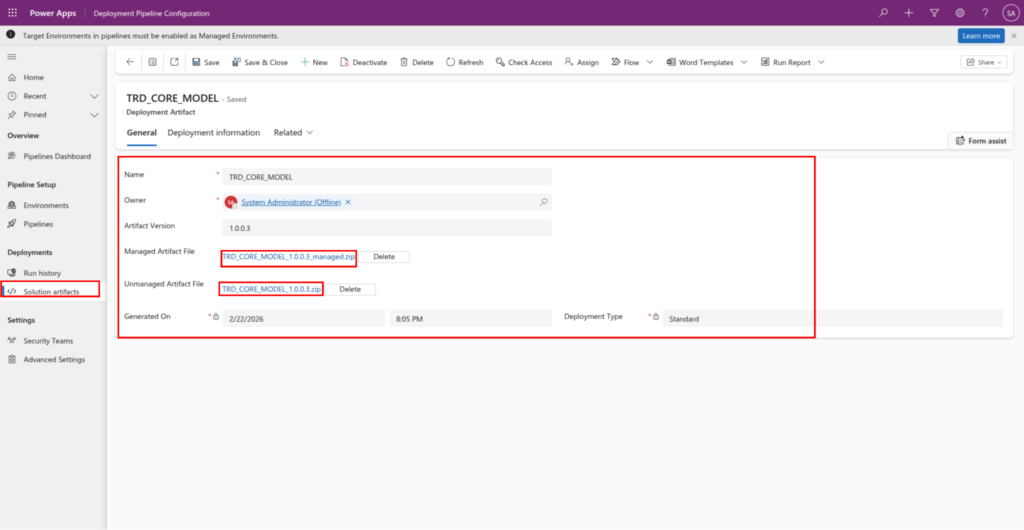
When you open an Artifact record, you are looking at the “frozen” version of your work. While it may look like a standard record, it acts as the master package for your entire deployment lifecycle.
Anatomy of an Artifact
An artifact in Power Platform Pipelines is essentially a container that stores the specific solution files generated during the export phase. It is composed of:
- Managed Artifact File (.zip): The primary file used for deployment to your Target Environments (like PREPROD and PROD). This ensures the solution is “locked” and cannot be edited directly in those environments.
- Unmanaged Artifact File (.zip): A backup of the source files. While the pipeline deploys the managed version, having the unmanaged artifact saved is critical for source control and disaster recovery.
- Metadata ( Artifact Version, etc): Information regarding the version number, the user who triggered the export, and the timestamp of the creation.
Why this structure matters
By storing both versions, Power Platform Pipelines ensure that you have a “Source of Truth.” If you ever need to recreate a specific state of your development environment, you can refer back to the unmanaged zip file stored within that specific Artifact record.
Summary
In this article, we covered the configuration of Power Platform Pipelines, focusing on declaring the Development Environment and Target Environments while linking them to a central deployment flow via Pipelines and Deployment Stages. We explored the role of Artifacts in ensuring that a single, secure version of a solution is used across the entire lifecycle. We also identified two key practical limitations: the “one solution per run” constraint and the requirement for manual intervention at each stage. Understanding these foundations is essential before we move toward full automation, which is the subject of the next article: “P3: Extending Power Platform Pipelines”.